A Step-by-Step Guide to Creating Stone and Paver Sidewalks and Driveways
Learn how to create durable, attractive stone and paver sidewalks and driveways with this step-by-step guide. Perfect for DIYers and landscaping pros alike.

Materials Needed and Quantities
The journey to laying a beautiful stone or paver sidewalk or driveway begins with gathering the necessary materials. Here’s a breakdown of what you will need:
Pavers or stones: The amount you need will depend on the size of your project. Typically, you should calculate the area by multiplying the length by the width of the sidewalk or driveway, then divide by the size of one paver to determine how many you'll require.
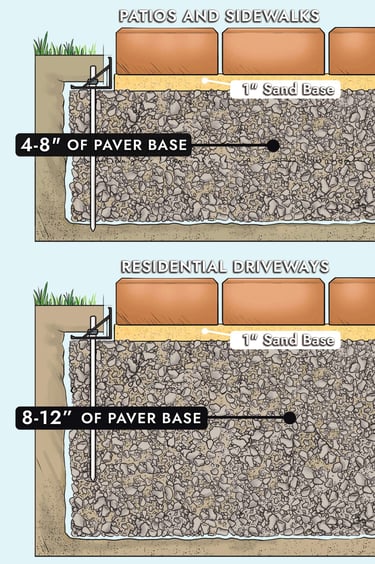
Sand: A bed of sand (approximately 1-inch deep) is essential for stability. For an average sidewalk of 3-foot width and 20-foot length, roughly 0.5 cubic yards of sand will suffice.
Gravel: For the base layer, about 4-8 inches of gravel will be necessary. An average driveway may require up to 2 cubic yards, depending on its size.
Edging materials: Use suitable edging stones or plastic edging to define the area and keep pavers in place. The quantity will depend on the perimeter of your project.
Polymeric sand: To fill the joints between pavers, approximately 1 bag will cover around 200 square feet.
Tools: Essential tools include a shovel, level, rubber mallet, and a plate compactor for the gravel.
Step-by-Step Process
Now that you have your materials gathered, let’s delve into the process of creating your stone or paver sidewalk or driveway:
Preparation: Begin by marking the layout of your sidewalk or driveway with stakes and string. This will create a clear working area.
Excavation: Dig out the marked area to a depth of about 8-10 inches to allow for the base materials. Ensure the depth is even throughout.
Base Layer: Lay down the gravel, compacting it thoroughly. This step is crucial as it provides the foundational support.
Sand Layer: Spread the sand over the compacted gravel to create a smooth bedding for the pavers. Use a rake and level to ensure an even layer.
Laying the Pavers: Start placing the pavers in your desired pattern. Use a rubber mallet to tap them into place, ensuring they’re level with the surrounding pavers.
Filling Joints: Once all pavers are laid, fill the joints with polymeric sand, sweeping it across the surface. This helps lock the pavers in place.
Final Compaction: Use a plate compactor to firmly set the pavers, ensuring there are no shifting or uneven places.
Conclusion
By following this detailed step-by-step guide, you can successfully create a stunning stone or paver sidewalk or driveway. The dedicated effort put into selecting materials, preparing the site, and carefully laying the pavers will yield a functional and aesthetically pleasing addition to your home. Enjoy the transformation!
Introduction
Creating a stone or paver sidewalk or driveway is an excellent way to enhance the aesthetic appeal of your property while also providing durability and functionality. This guide will take you through a step-by-step process, detailing the materials needed, the quantities required, and the entire procedure. Ultimately, you will not only understand what is involved but also feel confident to undertake the project yourself.
As you can see from this illustration your paver base will depend greatly on the size of your project. If you don't follow proper procedures overtime problems will develop such as separations, shifting and weed or grass growth. Here we will go over the step by step process and share some tips and tricks to installing your own paver system.